


G4 Owner’s Manual – 18 – Packing The Main Parachute
Before attempting to pack your main parachute, complete a course of instruction in parachute packing.
Mirage Systems, Inc. does not recommend one method of folding the main parachute over another. We suggest that you follow the folding instructions provided by the canopy manufacturer, a rigger, or your instructor, until you gain experience in the method you prefer. If you are unclear about any of the procedures described here, ask your instructor or a rigger for assistance.
Inspect the main deployment bag and prepare it for packing by replacing any broken or missing stow bands. Mirage, Inc. does not recommend one type or size of line stow band over another. We suggest that you follow the recommendation made by the canopy manufacturer, a rigger, or your instructor, until you gain experience in the types of stow bands available and what you prefer.
Inspect the main pilot chute. Cock the kill line if using a collapsible main pilot chute.
Important!
If using a collapsible main pilot chute, it must be cocked before every jump. Failure to cock the pilot chute could result in a parachute malfunction! When cocked, a blue mark on the kill line will be showing in the window near the curved pin. Consult your instructor or a rigger if you do not understand how to cock the pilot chute and verify that it has been cocked correctly.
Optional
If using a collapsible main pilot chute, the bridle will have a loop of slack inside the deployment when the pilot chute is cocked. Use care to make sure this loop does not loop around any part of your main parachute canopy, as damage to the canopy fabric may result. Some owners have recommended using a very small rubber band attached to the Rapide® Link to fold and stow the excess bridle webbing.
Set the brakes and stow the excess brake lines in the keepers on your risers. Perform a suspension line continuity check.
Fold the main parachute canopy and place it into the deployment bag.
Be sure to long fold the canopy slightly wider than the deployment bag closing flap. This will ensure that the packed deployment bag completely fills all corners of the main parachute container.
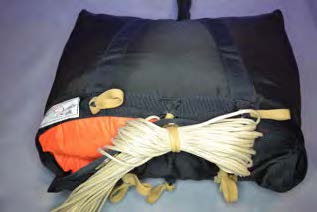
There are three types of main deployment bags available for your Mirage G4.1. These are Standard, Split, and Semi-Stowless. The main difference between all three is how the suspension lines are stowed.
When the parachute canopy is in the deployment bag, close the bag by making the locking stows on the closing flap. Some deployment bags have three locking stows, and some have four, determined by the size of the deployment bag.
The length of each suspension line locking stow (bight) is a matter of personal preference. We recommend a length of 2” to 2-1/2” past the stow band for locking stows. Follow the recommendation made by the canopy manufacturer, a rigger, or your instructor, until you gain experience in the length of stows that work best for your canopy and deployment bag.
Standard Deployment Bag
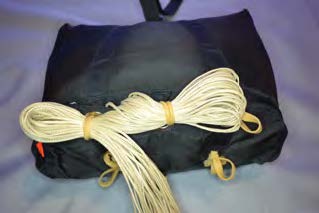
If the bag has three locking stows, make the center locking stow first, then alternate left or right for the two outside locking stows.
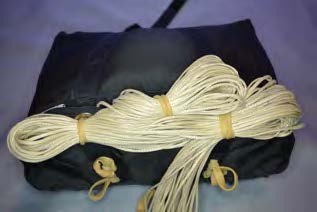
If the bag has four locking stows, make the first locking stows in the center, left or right, then alternate left or right to the outside stows.
If you need help, have a rigger or experienced packer show you the proper sequence.
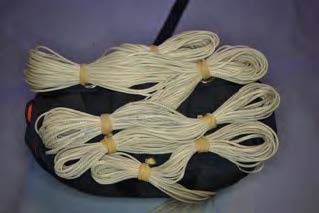
Stow the remainder of the lines alternating left or right until 12” to 15” (+/-) of lines remain between the last stow and the risers.