


Mirage Harness
The Mirage harness has four (4) parts.
- MLW : The main lift web is the front of the harness and is determined by the length of your torso.
- LP : The leg pads go from your hip bone, down between your legs and back up to the starting point.
- STAB : The stabilizers (waist) determine how snug the bottom of the rig is against your back.
- YOKE : If you have a large chest or thick shoulders (lift weights) we can lengthen the yoke over the shoulder.
Instructions
- Fill out the form on the right,
- The boxes at the top with red numbers are calculation fields that will show your results.
- It is very difficult to measure yourself alone, so you will need someone to assist.
- Try not to skip any measurements.
Container Size
A) Container Size
• Be sure to choose your actual container size because this affects the stabilizer calculation.
Sex & Weight
B) Sex
• Ladies, we need your cup size for yoke size & chest strap location.
C) Weight
• If your weight fluctuates from winter to summer, give us the weight you want the rig sizing to be based on. If you can’t decide then use your average weight.
D) Body To Legs Ratio (inseam)
• Look in the mirror and don’t be surprised if your legs are slightly long or short; most people are not exactly Joe Average.
Main Lift Web
E) Height
• Enter your height
F) Torso
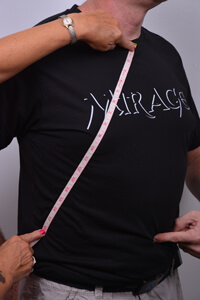

• Measure both left and right as a double check.
• Measure from the BOTTOM of the hole at the base of your throat, diagonally over your chest, to the very TOP of your hip bone AT YOUR SIDE.
• The top of the hip bone is approximately the same height off the ground as your belly button.
• Common mistakes are measuring too low on the hip (too long), or not enough to the outside (too short).
• A typical measurement would be between 15” (38 cm) and 20” (51cm), with the average being 16-18” (40-45 cm).
G) Long Girth
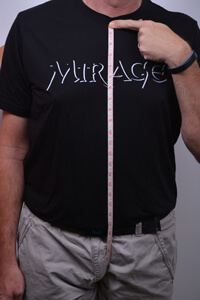
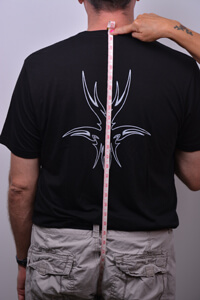

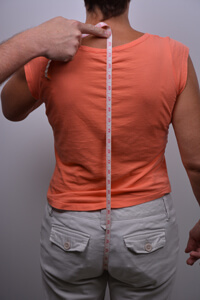
• Measure from the base of the throat (same starting point as the Torso measurement), down through the crotch and up your back to the base of the collar (protruding spine bone on the back of the neck).
• Tape should be snug, but not painful.
• Stand up straight – you should be at your maximum height.
H) Enter The Most Frequent Answer From E, F & G Above
• Use the most frequent result, not the average
I) Harness Type
• Select your harness type
J) I Like My Fit
• After you determine your main lift web measurement, you can adjust it slightly for your fit preference.
Leg Pads
K) Leg Pad Measurement
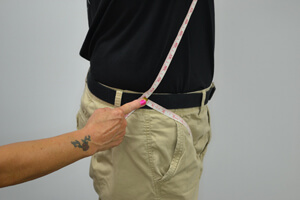
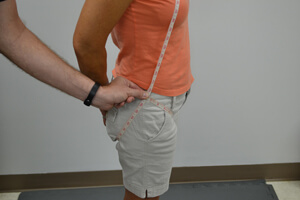
• Measure both left and right as a double check.
• Take EVERYTHING OUT OF YOUR POCKETS.
• Measure around the leg, as the leg strap travels, up to the SIDE of your hip bone. This is usually where your belt is.
• Be sure to pull the tape SNUG.
• The measurement should be in the range of 28” – 34” for most people.
• Leg pad length preference varies from person to person. Some people like their pads to overlap, some like the ends to just touch, and others like a few inches of gap. All of these are safe as long as you are sitting on the pad and your strap feeds through with at least 5-6 inches of tail.
Tip: Make sure your leg straps are high and tight when exiting the aircraft. Movement of leg straps during deployment can cause bruising – remember your student gear?
Stabilizer (waist)
L) Stabilizer (waist)
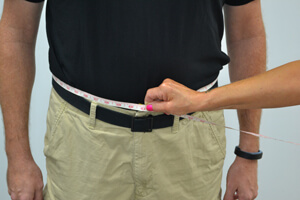
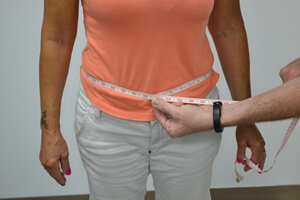
• This part of the harness cannot be adjusted, so you should look at this measurement first when looking at stock rigs.
• Measure around your waist at your belly button. This is not your pant size.
• Do not pull your stomach in. Be certain the tape is level.
• Stabilizers are sized in half inch increments: +1, +.5, std, -.5, -1. You can usually go up or down one size based on your comfort preference, but not more. Each increment is similar to loosening or tightening your belt one notch.
TIP: The Mirage elastic lumbar support is only for comfort. If you would like your rig to fit tighter against your back we recommend using our small sit fly belly band. It attaches to your hip rings and can fit in your back pocket when not being used. We also offer a larger belly band for swooping.
Yoke
M) Yoke (chest)
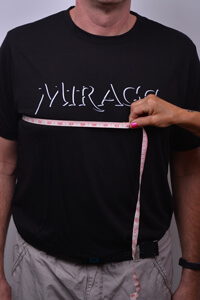
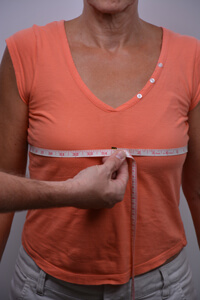
• Measure at the nipples
• Make sure the tape is level across your back
N) Common Yoke Adjustments
• Select only if applicable / desired.
• Most people get a standard yoke.
• +1 or -1 yoke means that the distance from the top of the rig to the 3 rings (over the shoulder) was adjusted by 1 inch. If you need a yoke extension but don’t have one, the rig may feel tight in the shoulders. Especially on smaller rigs.
• A +yoke becomes less of an issue on the M5 and larger as these rigs already have a slightly larger yoke. If you are borderline on the M5 or larger you may often go with a standard yoke unless you have thick shoulders (lift weights).
Shoulders
O) Shoulders
• If you have thick shoulders (lift weights) we can double check your yoke size. We need two photos. One facing the camera and one turned sideways.
Resizing An Existing Harness?
If measuring for a harness resize of a used Mirage, take your measurements and then refer to this page to see if it can be adjusted to fit you.
Reference Tools


⚠️ ATTENTION ⚠️
This form is having technical issues.
If it isn’t working then you can screenshot your measurements and email them to us
OR
print and email us page 5 of our paper order form with your measurements.

Photo Instructions
We’re happy to help make your rig fit !
If you need assistance with your sizing attach:
1) A photo of you standing facing the camera
- Wear a t-shirt & shorts or jeans (clothes not too baggy)
- Put feet shoulder width apart
- 1st hand – pointing at your belly button
- 2nd hand – hanging comfortably at your side
- Stand up straight and look forward
- Head-to-toe needs to be in frame
2) A photo of you standing sideways to the camera
- Turn sideways 90°
- Pretend you are holding a tray in front of you (shoulders normal, elbows still at your side)
- Look forward, do not turn towards the camera
- Head-to-toe needs to be in frame
NOTE: We need to see how long your body is compared to your legs and how thick you are, so please don’t wear jackets, long shirts or baggy pants.